Gatekeeper macOS açma ve kapatma işlemleri
Disable Gatekeeper With Terminal
To restore the legacy setting that lets you completely disable Gatekeeper, you’ll need to run a command in Terminal Terminal is macOS’s command line interface, and it’s easy to use once you get familiar with how Terminal works.
To disable Gatekeeper, follow these steps:
- Launch Terminal from Applications > Utilities.
-
Enter the following command:
sudo spctl --master-disable
- Hit Enter and type your admin password.
-
Hit Enter again.
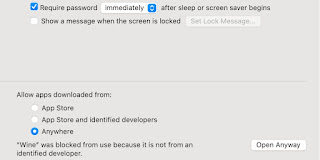
Now, the Anywhere option should be available under the Allow apps downloaded from section of System Preferences > Security & Privacy > General. From here, you can change the setting to loosen or tighten Gatekeeper security whenever you want. But please remember that sidestepping any of macOS’s built-in safety measures comes with risks.
Enable Gatekeeper With Terminal
If you wish to undo the change and re-enable Gatekeeper, you can, once again, do so with a simple Terminal command.
To enable Gatekeeper, follow these steps:
- Launch Terminal from Applications > Utilities.
-
Enter the following command:
sudo spctl --master-enable
- Hit Enter and enter your admin password if required.
- Hit Enter again.
Check Gatekeeper Status With Terminal
If you’re unsure about the current status of Gatekeeper and wish to double-check that the desired changes have occurred, you can do so with another Terminal command.
To check Gatekeeper status, follow these steps:
- Launch Terminal from Applications > Utilities.
-
Enter the following command:
spctl --status
-
Press Enter.


Yorumlar
Yorum Gönder